Pages

Thursday, September 8, 2011

What the flip yo... ID3DXSprite flipping

For a 2D platformer, it's often true that the "Run" animation frames are the same in either direction (run left, run right). It makes sense then to save texture space by allowing a sprite to be flipped.

While some sprite libraries come with the option to flip horizontally or vertically, the ID3DXSprite interface does not. If you're rolling your own sprite class using a quad, you can easily add this functionality by inverting the texture co-ordinates.

Another method of flipping, which works for ID3DXSprites as well, is to inverse the scale on the flipped axis.

Here's a simple pseudo code example:
D3DXVECTOR2 scale;
D3DXVECTOR2 position;
...
if(FlippedOnX)
{
   scale.x = -scale.x; //Invert the sprite on the x axis
   position.x += spriteWidth; //Shift the sprite by the amount of 'width' to re-position after the mirror flip
}

if(FlippedOnY)
{
   scale.y = -scale.y;
   position.y += spriteHeight;
}

Of course, you can get rid of the two if statements:
D3DXVECTOR2 scale;
D3DXVECTOR2 position;
...
scale.x = (scale.x * !FlippedOnX) + (-scale.x * FlippedOnX);
scale.y = (scale.y * !FlippedOnY) + (-scale.y * FlippedOnY);
position.x = posixion.x + (spriteWidth * FlippedOnX);
position.y = posixion.y + (spriteHeight * FlippedOnY);

This is far from secret knowledge, but when I was looking for an answer to this question, I found mostly short forum responses, such as: "Just invert the scale".  While this is to the point and it's easy enough to try for yourself, I figured an example and a brief explanation could have been of some use.

Thursday, September 1, 2011

Elpis 2D

I've been absent from blogging for some time now, and this I choose to blame on the lack of interesting things to say or willingness to say it. Anyway, I haven't ceased development and this post will bring the blog up to date with what I've been doing on Elpis.

The focus for the past little while has been on a 2D puzzle platformer game, or rather, the engine and script features required by this game. While Elpis was originally a 3D engine, I was fond enough of the framework to add 2D features to it instead of making a specialized 2D engine from scratch.

One feature we are toying with for this game is having multiple scenes displayed and semi-active at the same time. At first, I thought this might be problematic (being that we all like as large a display area as possible), but it's grown on me. The practicality of this feature is to allow the user to quickly swap between scenes to solve puzzles that take place in multiple game areas simultaneously, and to display to the user what effects he is having in each scene when interacting with another. We are aware that this feature has very limited uses, but it may prove effective as a puzzle element.

A small list of features that have been added for this game:
  • Simultaneously active scenes
  • Tiling 2D scene elements
  • Animated sprites
  • Basic 2D physics (simple, scalable, collisions using circles and rectangles as bounding volumes, sprite velocity)
  • Sepia toning (post processing effect)
  • Scene layer scrolling at varying speeds
  • Sprite animation frame audio triggers (ie, frame 3 of hero's run animation triggers the 'footfall' audio clip)
  • Audio playback using XACT

As for the game itself, there will be a dedicated post for it, but here's an image of a scene.

A conceptual throw together of one of the potential scenes for the game.

Tuesday, May 31, 2011

Class and Function Name Stylings

While designing frameworks and systems, class and function names are important to identify what the code is doing, but these names are often purposeful and inherently dry.

I've  slowly been changing my naming style in favour of common fantasy terminology to help keep the mindset of a Creator of Worlds and Forger of Lore. Here are some examples:

  • "EntityFactory"->"EntityForge",  
  • "SpriteManager"->"SpriteOverseer", 
  • "Enemy.Initialize()"->"Enemy.GiveBreadth()"

This is certainly fun, but it's an extra step to find a suitable name and it's important to avoid names that would be overly confusing. For example "AnimationController" helps "give life" to your characters (by animating them), but "LifeGiver" would be fantastically vague name.

Sunday, May 22, 2011

Gui for Game Dev Tools - IupLua

While designing tools for Elpis, I found the need for a more robust set of GUI controls than my game-tuned HUDish controls. There were several choices that I had to chose from:

  1. Use straight up, hand crafted, Win32 code
  2. Enhance Elpis' GUI to support tools
  3. Wrap Elpis with COM and load it up in C# or similar
  4. Use an existing library that interfaces through Lua
Naturally, I opted for #4. Interfacing through Lua means that the Elpis core doesn't have to know about a GUI at all, and there's no need to recompile.

Library, The Chosen 
Now came time to find, try, and chose a library. I was hoping that I would get a chance to play around with a bunch of new and cool libraries, though the ones I wanted to try had license limitations, did not use native controls (a finicky requirement), or did not interface with Lua.

The two libraries that were left of my choices were wxWidgets and IUP, and both of these shipped with Lua for Windows binaries. Of these, I chose IUP with IupLua binding for subjective reasons, in that I preferred the interface and IUP is focused on GUI functionality alone.

Usage Example
Assuming iup51.dll and iuplua51.dll are available to Lua's CPath, a simple require("iuplua") in Lua, and IUP will be accessible to you through the global iup object.

IUP comes with many many samples to show it's use, but one thing I struggled with was to use Elpis' existing Win32 Window as the parent for new controls. I shot a quick question to the user-list to find out if this was possible, and as it turns out, this is very easy for IUP dialogs...


Here is an example of a dialog with a menu used with Elpis:

local item_exit = iup.item{title = "E&xit", action=function() return iup.CLOSE end}
local item_open = iup.item{title = "&Open", action=OpenFile_OnClick}
local item_save = iup.item{title = "&Save", action=nil, active="NO"}
local function InitializeUI()

 menu = iup.menu
 {
  iup.submenu
  {
   iup.menu
   {
    item_open,
    item_save,
    {},
    item_exit
   };
   title = "File"
  };
 }

 mainDlg = iup.dialog
 {
  iup.vbox
  {

  };
  title="Volumetric Marker Generator", font="Helvetica, Bold 14", menu = menu,
  size="100x15",
  toolbox="YES",
  maxbox="NO",
  minbox="NO",
  resize="NO"
 }
 iup.SetAttribute(mainDlg, "NATIVEPARENT", gSystem.HWND);
 mainDlg:showxy(250,90)
end

The line to note is line 34: iup.SetAttribute(mainDlg, "NATIVEPARENT", gSystem.HWND);
This tells IUP to use gSystem.HWND (which returns Elpis' main hWnd) as the parent for the dialog mainDlg.
Retrieving the HWND is as simple as lua_pushlightuserdata(L, mainHwnd) from C++.

Sunday, May 8, 2011

Forcing DLLs into submission - Delay Loaded DLLs

When I wish to run Elpis outside of my IDE, the executable can be found in the debug directory...but it's likely that I won't find it in time for the holidays. There are far too many files exported to that directory!

Now, this wasn't an issue before, and by before I mean a year ago when I had less than 3 DLLs exported. I now have 19 dlls and for each of those DLLs, there are four more files associated to it: *.ilk, *.lib, *.pdb, and *.exp.
That's 76 files to look through for that damned exe! (Not including other debug exports, test project executables, folders, etc...)

The Deadend
Obviously, the solution is to separate the *.exe's from the DLLs. Oh, but wait... hold on a sec... I have a feeling this might not be so straight forward.

On application launch, Windows searches the following directories for the DLLs needed:
  1. The directory where the executable module for the current process is located.
  2. The current directory.
  3. The Windows system directory. The GetSystemDirectory function retrieves the path of this directory.
  4. The Windows directory. The GetWindowsDirectory function retrieves the path of this directory.
  5. The directories listed in the PATH environment variable.
Copy-Paste from MSDN

Ok, so I can't just set the DLL search directory without setting a path variable? Gross! I might have to use LoadLibrary and GetProcAddress for each of my functions/methods. That breaks my heart because Elpis has quite a few methods to export/import. How tedious.

So now what? I guess quitting is always an option, maybe give up my life as a programmer all-together and take up dancing as a strategic career move!

The Saving Grace(s)
As invigorating as that all sounds, I've found a convenient solution. The solution entered my life, and my dream to dance fluttered away.

SetDllDirectory

Obvious in its intention, SetDllDirectory allows you to set a relative or absolute path to search for Dlls (only one path can be set at a time).  So now, we could set the directory at runtime BUT, the DLLs are loaded long before even the main is reached.

Not a problem: A nice feature that was added to VC6 (so, not new) was the option to delay the loading of a DLL until it is first called. All you need to do to use delayed load is to configure the executable project a little bit.

Configs
On the executable project in Visual studio

Navigate to  Project Properties->Linker
1. Add Delayimp.lib; to "Additional Dependencies"
(This is library provided by Mr. Microsoft, and contains the functionality to delay loading)

2. Add all delayed DLLs to "Delay Loaded DLLs"

3. Make sure that nothing in the DLLs are touched until the SetDllDirectory is called (this includes instantiation of objects defined in the DLL)

And that is that. Elpis DLLs can now live wherever I want them too (within reason), as long as I let Elpis know where to find them.

Friday, April 29, 2011

On Compile Time

The other day, someone had asked me how long it took to recompile the entire Elpis solution. As far as I could remember, this was around 1 minute, but when was the last time I did a full recompile and watched it? My habit is to do something online or to get some food when something will take a while, so it is likely that my assumption was wrong.

So, I enabled build timings in VS, started a full recompile and got myself a snack. Upon returning a few minutes later, I was disgusted to see that it was still compiling! After it was done, I recompiled a few more times and averaged the recompile time to around 4 minutes.

Problems
The first problem was caused by languidness towards header structure and inclusion. One of Elpis' main header files was being included by a large majority of the headers and source files across all projects. This header happened to include the entirety of the DXUT framework, several major boost headers and quite a few other things. Convenient, but dirty.

The second problem had to do with class' being fully defined within their header, rather than within the source file.

Solutions
The first and second problems could easily have been corrected during development, but I was foolish and allowed it to accrue into the devastating creature it had become.

The solution to the first was to divide the mega-all-encompassing header into several categorized headers and to be careful that the heavy headers were only included when needed (a basic rule I've been ignoring for too long).

The solution to the second problem was to simply move definitions to the appropriate source files where possible.

Worth it?
After all of this, compile time had improved to approximately 1 minute. A last optimization was done to some of the large projects that get updated frequently, and that was to use precompiled headers. A feature I've never taken advantage of. This reduced full recompile time to ~40 seconds for the entire solution. Pre-compiled headers will be a big bonus in the long run, since the solution compile time is a tiny fraction of the original time.
 
There are plenty of other opportunities to improve the compile time in Elpis, but full recompiles have been rare. Each project now takes, on average, 5 seconds to fully recompile. Until I fully adopt TDD, or full recompiles become the norm, I'll be more than happy with my improved compile times.

Thursday, March 24, 2011

Script-in-waiting

In my 
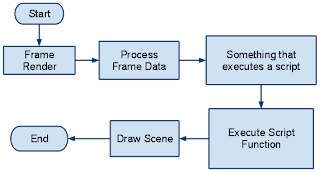
previous post, I mentioned a flaw with the interaction between Elpis and it's Lua scripts. The issue consisted of an application 'stall' while using sleep/wait functions in Lua. Looking at how Lua scripts are being called from the C++ side of things, it becomes obvious why this was happening.

Figure - 0
If a script used a wait function, the screen would not update until it was over, because scene drawing was waiting for the script to end.

The quick work-around I had used in "Oh BeeHive!" was to tell Elpis to run a line of script in x amount time  and let Elpis take care of the delays each frame. A global script function had to be made available to call from Elpis. A rather poor excuse for a wait function if you ask me.

A Modified Design

A good implementation of sleep or wait might be used something like this:

function Character:Attack(target)
...
  while(target:IsAlive()) do
    self:FireAt(target);
    wait(1000) -- 1 second reload time
  end
...
end

My first idea was to have all scripts running in an individual thread, but reading around the Lua manuals, another method was introduced to me.

If a script could be paused mid execution, it would be possible to start a script, let it pause if it wants, and resume it on the next frame update. This would allow the above script to pause the script until 1000 milliseconds has elapsed without freezing the game. Of course, this will not be a high-performance timer, since it relies on frame rate, but this should do fine for the games I will be developing. A plus side to this way over a script thread at this point, is that Elpis' architecture doesn't need many changes.  Being a lone dev with few hours to spare... a plus indeed!

Enter Lua Coroutines! These little guys let you pause scripts and resume them later, as described earlier. Here is the method I use now to execute a function with coroutines:

void ExecuteFunction(std::string const& _func, script_argList const& _args)
{
  //Create a new thread and pop   store a reference to it
  lua_State* pState = lua_newthread(m_lua.get_state());
  int refKey = luaL_ref(m_lua.get_state(), LUA_REGISTRYINDEX);
  
  //Get the function  (pushing it onto the stack) 
  lua_getglobal(pState, _func.c_str());

  PushArgsToState(pState, _args); 

  //Start/Resume the funciton call
  int res = lua_resume(pState, _args.size());
  if(res == LUA_YIELD)
  {   
    // Save the coroutine info for the next frame update
    AddYieldingCoroutine(pState, refKey, _func, _args);   

    // Pop the function from the stack
    lua_pop(pState, 1);
  }
  else if(res)
  {
    Log(m_lua.GetLatestError(pState));
  }
  else
  {   
    // Function complete, get returned values
    script_argList returnResults;
    GetReturnResults(pState, returnResults);   

    EventSystem.FunctionExecutionCompleted.invoke(_func, returnResults);       

    // Unreference the thread, allowing the GC to get rid of it at it's leisure
    luaL_unref(m_lua.get_state(), LUA_REGISTRYINDEX, refKey);  
  }
}

When a script function is called from Elpis, a new coroutine is created, arguments are pushed onto it's new stack and the function is called using 'lua_resume'.  If the Cfunction yield is called from the script, the coroutine is paused and stored in a list to be resumed on the next frame update. Once a function is completed, the return values are collected to the stack and a callback is executed to inform the caller that the function is complete. This callback event carries the return values with it.

The CFunction LuaYield looks like this:

int LuaYield(lua_State* L)
{
  return lua_yield(L, 1);
}

In lua, the wait function might look something like this:

function wait(duration)
  local totalElapsed = 0;
  local elapsedTime = GetFrameElapsedTime();
  if(elapsedTime ~= nil) then
    while(totalElapsed <= duration) do
      elapsedTime = GetFrameElapsedTime();
      totalElapsed = totalElapsed + elapsedTime;
      LuaYield(); --Call CFunction LuaYield
    end
  end
end

Issues Encountered

While testing out this new design, lua_newthread crashed intermittently. After a small bout of investigation, I discovered that the issue was being caused by a stack overload. New threads are pushed onto the stack, and in many cases this would be handled by the Lua Garbage Collector (GC), though this did not seem to be sufficient in this implementation. To solve this, I used luaL_ref and luaL_unref at key moments during the thread's life.

lua_State* pState = lua_newthread(m_lua.get_state());
int refKey = luaL_ref(m_lua.get_state(), LUA_REGISTRYINDEX);

luaL_ref pops the top item off the stack (getting rid of it before it gets buried) and returns a unique integer reference key (so we can get rid of it later). Having a reference to the thread keeps the garbage collector from mistakenly destroying it before it's time. I store both the lua_State* and the reference key until it's time to kill the coroutine. At which point, luaL_unref is called to let the GC know it's safe to be rid of this thread.

luaL_unref(m_lua.get_state(), LUA_REGISTRYINDEX, refKey);

Tuesday, March 8, 2011

Oh BeHive!

During my adventures adding features to Elpis, I sidetracked and made a small game...a themed Connect 4 clone. This is a work in progress, and the graphics are all programmer art. A download link is provided at the bottom of this post.

The idea was to make a small game and hopefully discover some of the flaws in the design of the engine... Success! I have discovered flaws! For instance, using 'sleep' in the script will freeze the game until the wait is over. For now, I am using an ugly recursive 'delay' that is just too terrible to describe (if you're curious though, the lua code can be viewed in the download. Oh, and to protect my pride: I want those who will look at the code to know that it is prototypical, so much of it is untammed)

The Game
A strange mutation in honey bees has surfaced. These bees create an anti-honey, poisonous to the honeybees we know and ... love?

The mutant bee queen, unable to accept her mutation, intends to destroy that which serves as a reminder of her disability. She will stop at nothing to destroy the honeybees.

The honeybees have but one defense: Pure honey. Putrid to the mutants, the honeybees can amass large quantities of honey to defend their hives.

Controls:
  • Left/Right - Move the new honey tile
  • Space - Drop the honey tile
Rules:
  • Connect 4 of your honey tiles or anti-honey tiles to dominate the hive (vertically, horizontally or diagonally)
  • Winning a round grants you a point and removes a point from the other player (the hive bar at the top represents the power struggle)
  • If a player reaches 8 points, he is declared the winner


Download

Sunday, February 27, 2011

The Predecessor

This is a project I had started while I was in college. It's a level editor for my first "game engine" (before I knew what an engine should look like).

It had begun as a personal project during the summer, and some of my peers had joined in to use it as a group project. After the project had been submitted and graded, I continued to add features to it.

In the video, you'll see me load a terrain from a heightmap and set it's textures, set up some simple lighting, add a few objects (some with key frame animations) and move them around, and play a bit with some water settings.


Some features have been disabled (such as shadows and dynamic lighting on water), since they had been acting strangely on my newer hardware...but that's only interesting to know if you were already aware they existed.

Friday, February 11, 2011

The Hills Are Alive! (Outdoor Terrain)

This week, I thought I'd talk about the terrain in Elpis. I like terrain! Terrain is nice!
Also, an afore warning: this post is likely to transform into a musical featuring Julie Andrews...


Implementation of Choice

The terrain implementation in Elpis can be found in an article in Game Programming Gems 6, titled "GPU Terrain Rendering" by Harald Vistnes (Chapter 5.5).  Seeing as the article in the book articulates the technique far better than I could, I will not be describing the method in detail. I will, however, skim over the implementation and record any modifications I plan to make and eventually how I intend to make them.

The general idea behind this algorithm is to provide a high detailed terrain while keeping memory and CPU requirements low, and pre-load time to a minimum. To do this, a small regular grid vertex buffer is repeatedly scaled according to the LoD (Level of Detail), morphed on the GPU according to the heightmap, positioned, and drawn.

Figure 0 - 17x7 LoD/Quadtree
The single vertex buffer used contains a 17x17 patch of vertices. As seen in figure 0, each patch of the terrain is divided into four more patches, which have been scaled to half the width and height. The division is essentially a quadtree.

The denser areas in figure 0 are one level of detail higher than the patch of lower density.


Figure 1 - Terrain

Figure 2 - Wireframe
The heightmap and normal map used for the terrain in figure 1 and 2 were borrowed from Game Programming Gems 6's CD-ROM.

Figure 1 shows the terrain in solid render mode and figure 2 is rendered in wireframe mode. In figure 2 we can see that it is a regular grid terrain implementation and there is a clear separation between terrain patches.  Along the edges of each patch, skirts are generated to cheaply and effectively eliminate cracks that occur when mixing LoDs.


Feature Lust

It is a very good terrain rendering algorithm, but the article was kept intentionally simple and featureless for ease of comprehension. For instance: it is rendered in a single (kind of ugly) colour; lighting is static; culling is minimal; and other lacking features that I can't think of right now, or that I'll describe later.


Figure 3 - Bounding Boxes
 
Ah yes, here's another! In figure 3, the bounding boxes for a single LoD are displayed. It's plain to see that the bounding volumes were calculated using the minimum and maximum height of the entire terrain (since they are all identical in size and align at the top), rather than that of the patch's height. In fact, the implementation uses the minimum (0) and maximum ALLOWED height (1 * MAX_HEIGHT). The bounding box is currently used for frustum culling, but can later be used for other things like collision detection.

The point of frustum culling is to cut out unseen data as early as possible, to avoid unnecessary GPU work. The tighter the fit of the bounding volumes, the more accurate the incision will be, the fewer useless draw calls are made.

Summary of feature lust: I want sweet colours and textures, fancy dynamic lighting and shading, tighter bounding volumes for frustum culling, and maybe some occlusion culling if necessary. It would also be nice to use displacement maps for terrain morphing, but I haven't a use for this yet.


Exit

You can expect posts regarding the features mentioned above to pop up every now and again. My next post will be of a more immediate feature that I have made reference to in my first post: Large world support.

Here's a small clip of the terrain in wireframe mode to show the changes in LoD:


Friday, February 4, 2011

First thing I gotta do is ... Oooo, a distraction! ... Where was I?

Having a full time job and a 2 hour commute eats at your time and soul, but with the little time and energy you have left, you'd really like to build a game from scratch (for learning purposes as much as pride). A huge task by anyone's standards. So to get the most out of your time and to keep you from being reminded that there's a world outside, you'll need to do away with all them distractions and get some clairvoyance spells... or something. But enough about you, let's talk about me!

First thing's first: If this kinda-too-large-for-one-person project is going to succeed, I need to be the project manager, designer, director and hero (coder). Oh, and I need to cut the reddit feed from my iGoogle page before I hurt myself. [+3 productivity].

To keep me from hating life, I like to squeeze in some gaming and reading into my week [+4 happy].
I can read novels during my bus ride commute to work (and thanks to ebook readers, I can read any sloppy romance novel I please without the judging glares of those who sit near me!).

Since I must, I've allocated a small portion of time to the habits that make me go 'huh? where did the time go?!' (ie. Facebook, Reddit/Digg/etc...), but one of my eyes is fixated on the clock at all times.

Break it down! (-stop, Hammer time) [+4 focus]:
  1. Identify the high level idea of your final product (game story, game type, game play, blah blah). Completing this game is the long-term goal.
  2. Break it down some to get the features you'd like to have in the game.
  3. Break the features down and gather all the components you think you'll need to make this work.
  4. Select the most important components/systems for your game (I deem this Phase 1 of the project).
    Ok, so I know what I want from my game, now all I have to do is skip sleep and finish it before the sun comes back up! Wait, I have a better idea...

    Gonna' manage ma time! [+3 focus, +4 productivity] :
    1. Set milestones for each broken down (reasonably sized) iteration or phase. I try to split up the tasks into 2 month iterations, but that is just my preference.
    2. Using a ticket tracking system (I've been using Trac), I've placed a bunch of "feature request" tickets under the current milestone target for each major feature I'd like complete. The goal is to complete all of these feature requests before the 2 month period is over. This is the mid-term-ish goal.
    3. Using a project management application (Example: OpenProj or Microsoft Project), I've estimated the amount of time to complete each feature. I've over estimated each by approximately 2.25x, in order to give me time for any hiccups. Ideally, these features should add up to the 2 month period milestone (I add more features to the list if I don't anticipate many complications, but I could instead set the milestone date to the estimated end of features date). This is the short-term goal.
    4. Each day, I list the small portion of the current feature to cram into my daily TO-DO list to accomplish the short-term goal, which will accomplish the mid-term-ish goal and hopefully, eventually the long-term goal. This is the immediate goal.
    Now that all this project planning is behind me, all I need to worry about is the immediate goal and I'll have a game in no time! [+3 happy]

    Summary (tl;dr): To keep me focused and motivated I start from the end goal and then break it down into smaller chunks until my puny mind can comprehend the task at hand, and eventually my long-term goal will be realized.

    Final Self Improvements:

    Happiness + 7
    Productivity + 7
    Focus + 7